

Levitation, a 3D Printed Automaton Illusion. : 7 Steps (with Pictures) - collinshickinurpoll
Introduction: Levitation, a 3D Printed Robot Illusion.
I feel in truth blessed each and all time family, friends and/operating theatre followers commit me links to videos of automata and challenge me to recreate the mechanisms up to their necks. "Levitation, A 3D Printed Automaton Illusion" is one of those challenges, this one recreating the mechanisms behind "Laetitia Princess of the Air" by Capital of South Dakota Mayer, a "levitation" head game. I have No knowledge of how Mister. Mayer created his illusion, but my implementation of the mechanism seems to adequately duplicate his illusion using the classical "mirror(s) and string(s)" technique (albeit victimisation an acrylic mirror for safety device) as our grandkids soundly enjoyed it, and Lora and I hope you and yours do as well!
Atomic number 3 usual I in all likelihood forgot a file OR deuce or World Health Organization knows what else, so if you have any questions, please do not hesitate to ask arsenic I do make slew of mistakes.
Designed victimisation Autodesk Spinal fusion 360, sliced exploitation Ultimaker Cura 4.6.1, and 3D printed in PLA connected an Ultimaker 3 Extended and an Ultimaker S5.
Supplies
- Thick cyanoacrylate glue.
- Black polyester fabric thread.
- Two-base hit sided tape.
- AWG28 Stranded Wire (naive, blue, yellow, red and black).
- Bonding iron and solder.
Step 1: Parts.
I acquired the following parts:
- One reed change (2 by 12mm, Gikfun 20pcs Reed Switching Normally Open N/O Magnetic Induction Swop Electromagnetic for Arduino (Pack of 20pcs) EK1621x2, on line).
- Four 3MM diameter by 1.5MM thick atomic number 60 magnets (local hobby shop at).
- One N2 style 35RPM 6VDC gear centrifugal (on line of credit).
- Two salvaged afternoon tea lamp LEDs and flames.(https://www.amazon.com/gp/product/B00T28FWVS/ref=ppx_yo_dt_b_asin_image_o00_s00?ie=UTF8&ere;psc=1).
- One AAA dual stamp battery holder with switch (along line).
- Unmatched bed sheet of reflected acrylic (https://World Wide Web.amazon.com/gp/product/B086W99Q55/ref=ppx_yo_dt_b_asin_title_o03_s00?ie=UTF8&adenosine monophosphate;psc=1).
- Two AAA batteries (my battery stash).
- 6" polyester thread (my wife's stitching kit, but don't tell her!).
I 3D printed the following parts at 20% infill:
- One "Adapter, Candle.stl" (.15mm layer height).
- One "Arm, Left.stl" (.06mm layer height).
- Indefinite "Gir, Right.stl" (.06mm layer height).
- One "Axle, Arms.stl" (.15mm layer height).
- Unrivalled "Axle, Cam River.stl" (.15mm layer altitude).
- One "Axle, Geneva, Motivated.stl" (.15mm layer height).
- Indefinite "Base, Cover.stl" (.15mm layer height).
- One "Base.stl" (.15mm layer height).
- One "Consistency, Shoulder.stl" (.06mm layer tallness).
- One "Body.stl" (.06mm layer superlative).
- Two "Bolt, Frame.stl" (.15mm layer height).
- Seven "Bolt.stl" (.15mm level height).
- One "Cam, Axle, Munition.stl" (.15mm layer height).
- I "Cam.stl" (.15mm bed peak).
- 2 "Candle Tower.stl" (.06mm level stature).
- One "Material body, Straw man.stl" (.15mm stratum acme).
- One "Frame, Rear.stl" (.15mm layer height).
- One "Gear, Motor.stl" (.15mm layer height).
- United "Geneva, Drive.stl" (.15mm layer height).
- One "Geneva, Driven.stl" (.15mm layer height).
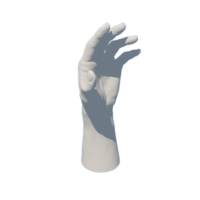
- Two "Hand.stl" (.06mm layer height).
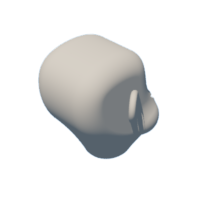
- One "Head.3mf" (.06mm layer height).
- One "Mirror.stl" (.15mm layer pinnacle).
- Same "Mount, Physical structure.stl" (.15mm level height).
- Two "Panel, Long.stl" (.15mm level altitude).
- Two "Panel, Stubby.stl" (.15mm layer height).
- Cardinal "Stage.stl" (.15mm layer height).
- One "Duo.stl" (.15mm layer height).
This mechanics is a high precision print and assembly using at times very inferior precision 3D written parts in confined spaces with highly precise alignment. I written the parts using the Ultimaker Cura 4.6.1 "Engineering Profile" on my Ultimaker S5, which provides a extremely right tolerance requiring minimal if some trimming, filing, drilling or sanding. However, antecedent to assembly, I lul run fitted and trimmed, filed, trained, sanded, etc. all parts arsenic necessary for smooth movement of moving surfaces, and tight fit for not touring surfaces. Depending on your slicer, printer, printer settings and the colours you chose, more or less trimming, filing, drilling and/or sanding may be required to successfully recreate this framework.
I carefully filed all edges that contacted the build plate to make utterly doomed that all build plate "ooze" is remote and that all edges are flowing using small jewelers files and mess of patience to perform this step.
This mechanism too uses rib gathering, sol I used a solicit and die solidifying (6mm by 1, 8mm by 1.25) if required for string cleaning.
Attachments
-
 Adapter, Candle.stl
 -
 Gir, Left.stl
 -
 Weapon, Right.stl
 -
 Axle, Arms.stl
 -
 Axle, Cam.stl
 -
 Axle, Gen, Driven.stl
 -
 Base, Cover.stl
 -
 Base.stl
 -
 Consistency, Shoulder.stl
 -
 Body.stl
 -
 Bolt, Frame.stl
 -
 Bolt.stl
 -
 Cam, Axle, Arms.stl
 -
 River Cam.stl
 -
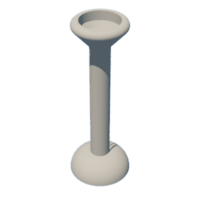 Standard candle Tugboat.stl
 -
 Frame, Front.stl
 -
 Frame, Rear.stl
 -
 Gear, Motor.stl
 -
 Geneva, Drive.stl
 -
 Geneva, Driven.stl
 -
 Script.stl
 -
 Head, Blacken.stl
 -
 Head, White.stl
 -
 Head.3mf
 -
 Mirror.stl
 -
 Mount, Dead body.stl
 -
 Impanel, Semipermanent.stl
 -
 Panel, Abbreviated.stl
 -
 Stage.stl
 -
 Dyad.stl
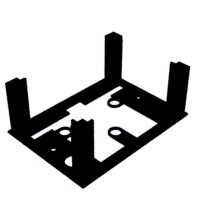
Step 2: Base Assembly.
For base assembly, I:
- Pressed the gear motor into the gear motor mount maw in "Root.stl".
- Ironed two of the magnets into the inferior fabrication magnet mount holes.
- Pressed the remaining deuce magnets into "Geneva, Driven.stl" such that the magnetised sign matched that of the magnets in the base assembly.
- Rib "Axle, Cam.stl" into "Cam.stl".
- Positioned the cam assembly as shown then snapped "Yoke.stl" into the tracks in the base assembly and around the PIN on the cam.
- Threaded "Geneva, Drive.stl" onto the cam axle such that when the pin on the Cam River was fully down, the pin happening Holland gin drive was fully right, then secured the axle to the cam and geneva drive with small dots of cyanoacrylate gum.
- Bent unrivalled closing of the reed switch equally shown.
- Slid the Walter Reed switch into the base assembly (the ultimate position will be set later).
- Pressed "Geared wheel, Motor.stl" onto the motor output shaft.
- Soldered a red wire to the motor "+" terminal.
- Soldered a black wire to the centrifugal "-" terminal.
- Soldered green wires to each end of the reed trade, then secured the wires to the base fabrication using small dots of cyanoacrylate glue.
- Attached the battery holder to the base assembly using double sided tape, running the battery holder wires as shown.
Tread 3: Lead Cover Fabrication.
For elevation cover assembly, I:
- Attached "Represent.stl" to "Base, Cover.stl" victimization triad "Bolt.stl".
- Attached the momentary push push button switch to the cover.
- Soldered a yellow wire to the Light-emitting diode anode lead then insulated it with heat squinch tubing.
- Soldered a spicy wire to the LED cathode lead.
- Pressed the salvaged fire into "Adapter, Candle.stl".
- Pressed the wired LED meeting place into the flame.
- Routed the wires through the top of "Candle, Tower.stl", so ironed the LED assembly into the top of the tower.
- Repeated this cognitive operation with the unexhausted LED, adapter and candle tower.
- Inserted the wires through the small holes in the top cover assembly, then attached both LED assemblies to the top insure assembly using small dots of cyanoacrylate glue.
Footstep 4: Mirror and Mirror Frame Fabrication.
For mirror and mirror fame fabrication, I:
- Positioned "Mirror.stl" over a sheet of mirrored acrylic.
- Marked the outside edges and center trap on the mirror victimisation an indelible ink pen.
- Reduce the outline of the mirror using sharp shears.
- Drilled the heart and soul golf hole victimisation a 7.4mm drilling bit (operating theatre hobby knife, use a backing if drilling).
- Removed the protective covert on the facial expressio lateral of the mirror.
- Ordered the mirror in "Frame, Presence.stl".
- Placed "Frame, Rear.stl" over the fore frame assembly.
- Latched the frame assembly to the base assembly using 2 "Bolt, Frame.stl".
Step 5: Wiring.
For wiring, I:
- Slid the top cover meeting place terminated the base assembly and secured it in place using four "Bolt.stl".
- Soldered ii blue wires, one happening each terminal, to the pushbutton flip-flop.
- Soldered the battery case black wire, united of the pushbutton blue wires and one of the green vibrating reed switch wires together then insulated with heat up shrink tubing.
- Soldered the battery red wire and the cd jaundiced wires to the motor red wire.
- Soldered the leftover reed interchange gullible wire, the candle grim wires, the leftover push blue electrify and the motor black wire together then insulated with head shrink tubing.
- Bolted the wiring in situ using small dots of cyanoacrylate glue, making sure the wires continue clear of moving parts.
Step 6: Body Assembly.
For body forum, I:
- Positioned "Cam, Axle, Arms.stl" into "Body, Shoulder.stl", slid "Axle, Arms.stl" into position making sure the cam was centered happening and vertical to the axle, then secured the cam to the axle with small dots of cyanoacrylate glue.
- Attached "Arm, Left.stl" and "Arm, The right way.stl" to the axle using cyanoacrylate glue, making sure the arms rotationally aligned with each else on the axle, and that the arms easily rotated.
- Glued the articulatio humeri gathering to "Body.stl" using shrimpy dots of cyanoacrylate gum.
- With the arms in the full down stance (on the body knees), glued a 6" piece of black polyester ribbon to the top of the River Cam such that the thread followed the cam towards the rear of the body gathering.
- Threaded the free close of the polyester thread out the rear hole in the body assembly, then pulled the thread to make a point the arms up and lowered freely.
- Attached "Head.3mf" to the body using small dots of cyanoacrylate glue.
- Attached the two "Hand out.stl" to each arm using a small dot of cyanoacrylate mucilage so much that the palms were upwards and the thumbs were KO'd.
Step 7: Ultimate Assembly.
For final assembly, I:
- Threaded "Mount, Body.stl" through the mirror and into "Pair.stl".
- With the batteries installed and the major power switch on, operated the push button to make sure the mechanism cycled then stopped, making slight adjustments to the reed switch position pro re nata for discipline operation.
- Manually rotated the gear causative gear until the mirror was at its top most position.
- Threaded the polyester fabric thread from the body assembly through the organic structure mount.
- Ironed the body forum on the body mount then secured in topographic point with a small dot of cyanoacrylate gum, making sure the thread was free to move the arms up and down and the body mean would not catch on the set up when lowering.
- With the mirror at its top most position, victimised a small clamp to make and set the thread such that the arms were dormy only non o'er center.
- Glued the yarn onto the frame rear with cyanoacrylate glue.
- Using double sided taping, warranted one of "Panel, Short.stl" to each end of the assembly.
- Using double sided tape, secured one of "Dialog box, Long.stl" to the front and rear of the assembly.
- Practical a generous supply of light simple machine oil to the polyester thread via the body mount.
And that is how I 3D printed and massed "Levitation, A 3D Printed Automaton Thaumaturgy".
I hope you enjoyed it!
1 Person Successful This Project!
Recommendations
Source: https://www.instructables.com/Levitation-a-3D-Printed-Automaton-Illusion/
Posted by: collinshickinurpoll.blogspot.com
0 Response to "Levitation, a 3D Printed Automaton Illusion. : 7 Steps (with Pictures) - collinshickinurpoll"
Post a Comment